Disclaimer
Web scraping is a grey area - be sure to research the legality of the source you intend to scrape!
Setup ⚙️
Prerequisite
Presuming you have Node.js installed let’s jump right in and create the endpoint! (If you don’t head over to https://nodejs.org/en/)
5 Minutes is ambitious so let’s get moving!
Setting up our server
Fire up a terminal and type the code below to get a default package.json - no questions asked!
npm init -y
With that same terminal window, we can install the dependencies that we’re going to use.
Note: Fixed versions are used here to maintain future compatibility with the tutorial. Feel free to upgrade at a later stage.
npm i -S express@4.17.1 puppeteer@1.17.0
npm i -D nodemon@1.19.1
The -S tells npm to save express (used for creating our endpoint) and puppeteer (used to scrape our webpage) in our package.json under dependencies.
The -D tells npm to save nodemon (used for hot-reloading our node.js code) in our package.json under devDependencies.
Now we will create a file called index.js at the root of our project. Inside we can add a basic server using the code below.
const express = require("express");
const app = express();
app.listen(3000);
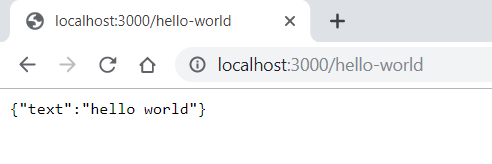
app.get("/hello-world", function(req, res) {
res.status(200).json({ text: "hello world" });
});
Navigate to the package.json and modify the scripts object to look like the following.
"scripts": {
 "start": "nodemon index.js"
},
Now run npm start and head over to chrome and navigate to localhost:3000. You should be greeted with a JSON response that looks like the response below.
Now let’s get scraping…
Scraping the data ⛏️
Let’s start by renaming our endpoint to what we want to achieve. I’m going to scrape the title from the most recent post on my own website so I’ll name my endpoint philipgriffin/title like so.
app.get("/philipgriffin/title", function(req, res) {
Modify the code within the get callback and replace it with the code below
app.get("/philipgriffin/title", function(req, res) {
  void (async () => {
    const browser = await puppeteer.launch({ headless: true });

    try {
      const page = await browser.newPage();
      await page.goto("philip-griffin.com");
      const postTitleElement = await page.$(".post-title");
      const postTitle = await page.evaluate(
        (postTitleElement) => postTitleElement.textContent.trim(),
        postTitleElement
      );
      res.status(200).json({ postTitle: postTitle });
    } catch (e) {
      res.status(500).json({ error: "error" });
    } finally {
      await browser.close();
    }
  })();
});
💡 Quick tip: For Objects with the same key value pairing we can use
{ postTitle }instead of{ postTitle: postTitle }to achieve the same behaviour. Released in ES6.
Okay! We’ll take a closer look at this 🔍
void (async () => {
  /*body*/
})();
Here we simply create an asynchronous immediately invoked function expression. This is required so that we can use the await keyword to wait for promises to complete. async and await were introduced in ES 2017 and allow us to deal with promises in a cleaner fashion - something we’ll see in a few moments.
const browser = await puppeteer.launch({ headless: true });
Using await we can tell puppeteer to launch in a headless mode so that we don’t physically watch the scraping occurring. Feel free to change this to false if you want to watch!
The launch function returns a promise although rather than allowing asynchronous execution we will wait until the promise has been completed by specifying the await keyword as we need to use the browser.
From here on we tell puppeteer to connect to our desired website and begin scraping. Once we get what we need we can return it like before and we now have our own API to scrape a website!
Check it out below along with the source code. 👇
Source code: Github
Demo